Windows 365 x Azure Virtual Desktop x Advanced Device Redirection
Windows 365 x Azure Virtual Desktop (#AVD) x RemoteFX - USB redirection
Table of contents
- Introduction
- What is RemoteFX
- Device redirection overview
- RemoteFX Configuration
- Testing
- Conclusion
- Resources
Introduction
What is a Cloud Engineering Workspace without the loved engineering pheripherie device, the Spacemouse and all the other fancy peripherals they are working with? In this post we cover all essentials around the “legacy” RemoteFX USB redirection in an Azure Virtual Desktop (AVD), Windows 365 (W365) and Remote Desktop environement and how to configure it.
This is especially relevant with the (latest) announce previews for Windows 365 GPU powered workloads.
Note: Of course, this applies to other USB devices too.😊
What is RemoteFX?
RemoteFX was invented and developed by Calista Technologies and quickly acquired by Microsoft in 2008.
It was released in 2011 as part of Service Pack 1 (SP1) for Windows Server 2008 R2 and Windows. It was designed to deliver a rich user experience and graphic hardware support to Hyper-V virtual machines (VMs). Over the last 9+ years, RemoteFX improved the overall user experience during a remote desktop session and let users enjoy high-quality media support, audio-synchronization, graphics, and RemoteFX USB redirection.
With new features like Adaptive Graphics, RemoteFX Multi-Touch, RemoteFX Media Redirection, and RemoteFX for WAN the RDP Protocol and experience improved massivley.
With Windows Server 2012, and subsequent releases including RemoteFX in Windows 10, RemoteFX was designed with more default features that made it simpler and easier to use. What remains are the settings you can enable or disable.
Device redirection overview
AVD, Windows 365 and RDPs allow us to use specific types of devices effectively in a remote session, e.g.:
- Easy Print, which allows users to print to local printers in remote sessions
- Drive Redirection, which allows users to access the file system on any local drive in a remote session, including USB drives
- Smart Card Redirection, which allows users to authenticate to and in a remote session by using smart cards/e-tokens
- Plug-and-Play Device Redirection, which allows users to access PTP digital cameras, MTP music players, and POS for .NET devices in a remote session, among others
- Input Redirection, which allows the use of keyboards/mice in remote sessions
- Audio Redirection, which allows recording and playback of audio in remote sessions
- Port Redirection, which allows the use of serial and parallel ports in remote sessions
For AVD, these high-level redirections can be controlled and resitricted via the RDP Properties directly from the portal.
However, there are many devices like the spacemouse, printers webcams, scanners and more which are not covered by this redirections. RemoteFX USB redirection enables you to redirect these devices and brings you the best of both worlds and an improved user experience.
Note: RemoteFX USB redirection compliments your high-level redirection and doesn’t replace them.
Device redirections compared
| RemoteFX USB Redirection | RDP High-Level Device Redirection |
|---|---|
| Does not require drivers on the local client | Requires drivers for the device to be installed on the local client |
| Requires the device driver to be installed on the session host or cloud pc | Generally does not require drivers on the session host or cloud pc |
| Uses one redirection method for many types of devices | Uses a specific, unique method for each type of device being redirected |
| Forwards URBs to and from the device over the RDP connection | Exposes high-level device functionality in the remote session by using an optimized protocol for the device type |
| Enables ONLY ONE session to use a device at a given time; the local client cannot use the device while an RDP session is using it | Enables any number of sessions to access the device simultaneously, including the local client |
RemoteFX Configuration
Enable RemoteFX on your AVD session hosts or Windows 365 Cloud PC
-
Open run with Windows + R and enter gpedit.msc. Open the “Local Group Policy Editor”.
-
From the navigation tree on the left, select: Computer Configuration > Administrative Templates > Windows Components > Remote Desktop Services > Remote Desktop Session Host > Device and Resource Redirection. Open Do not allow supported Plug and Play device redirection and select Allow plug&play device redirection
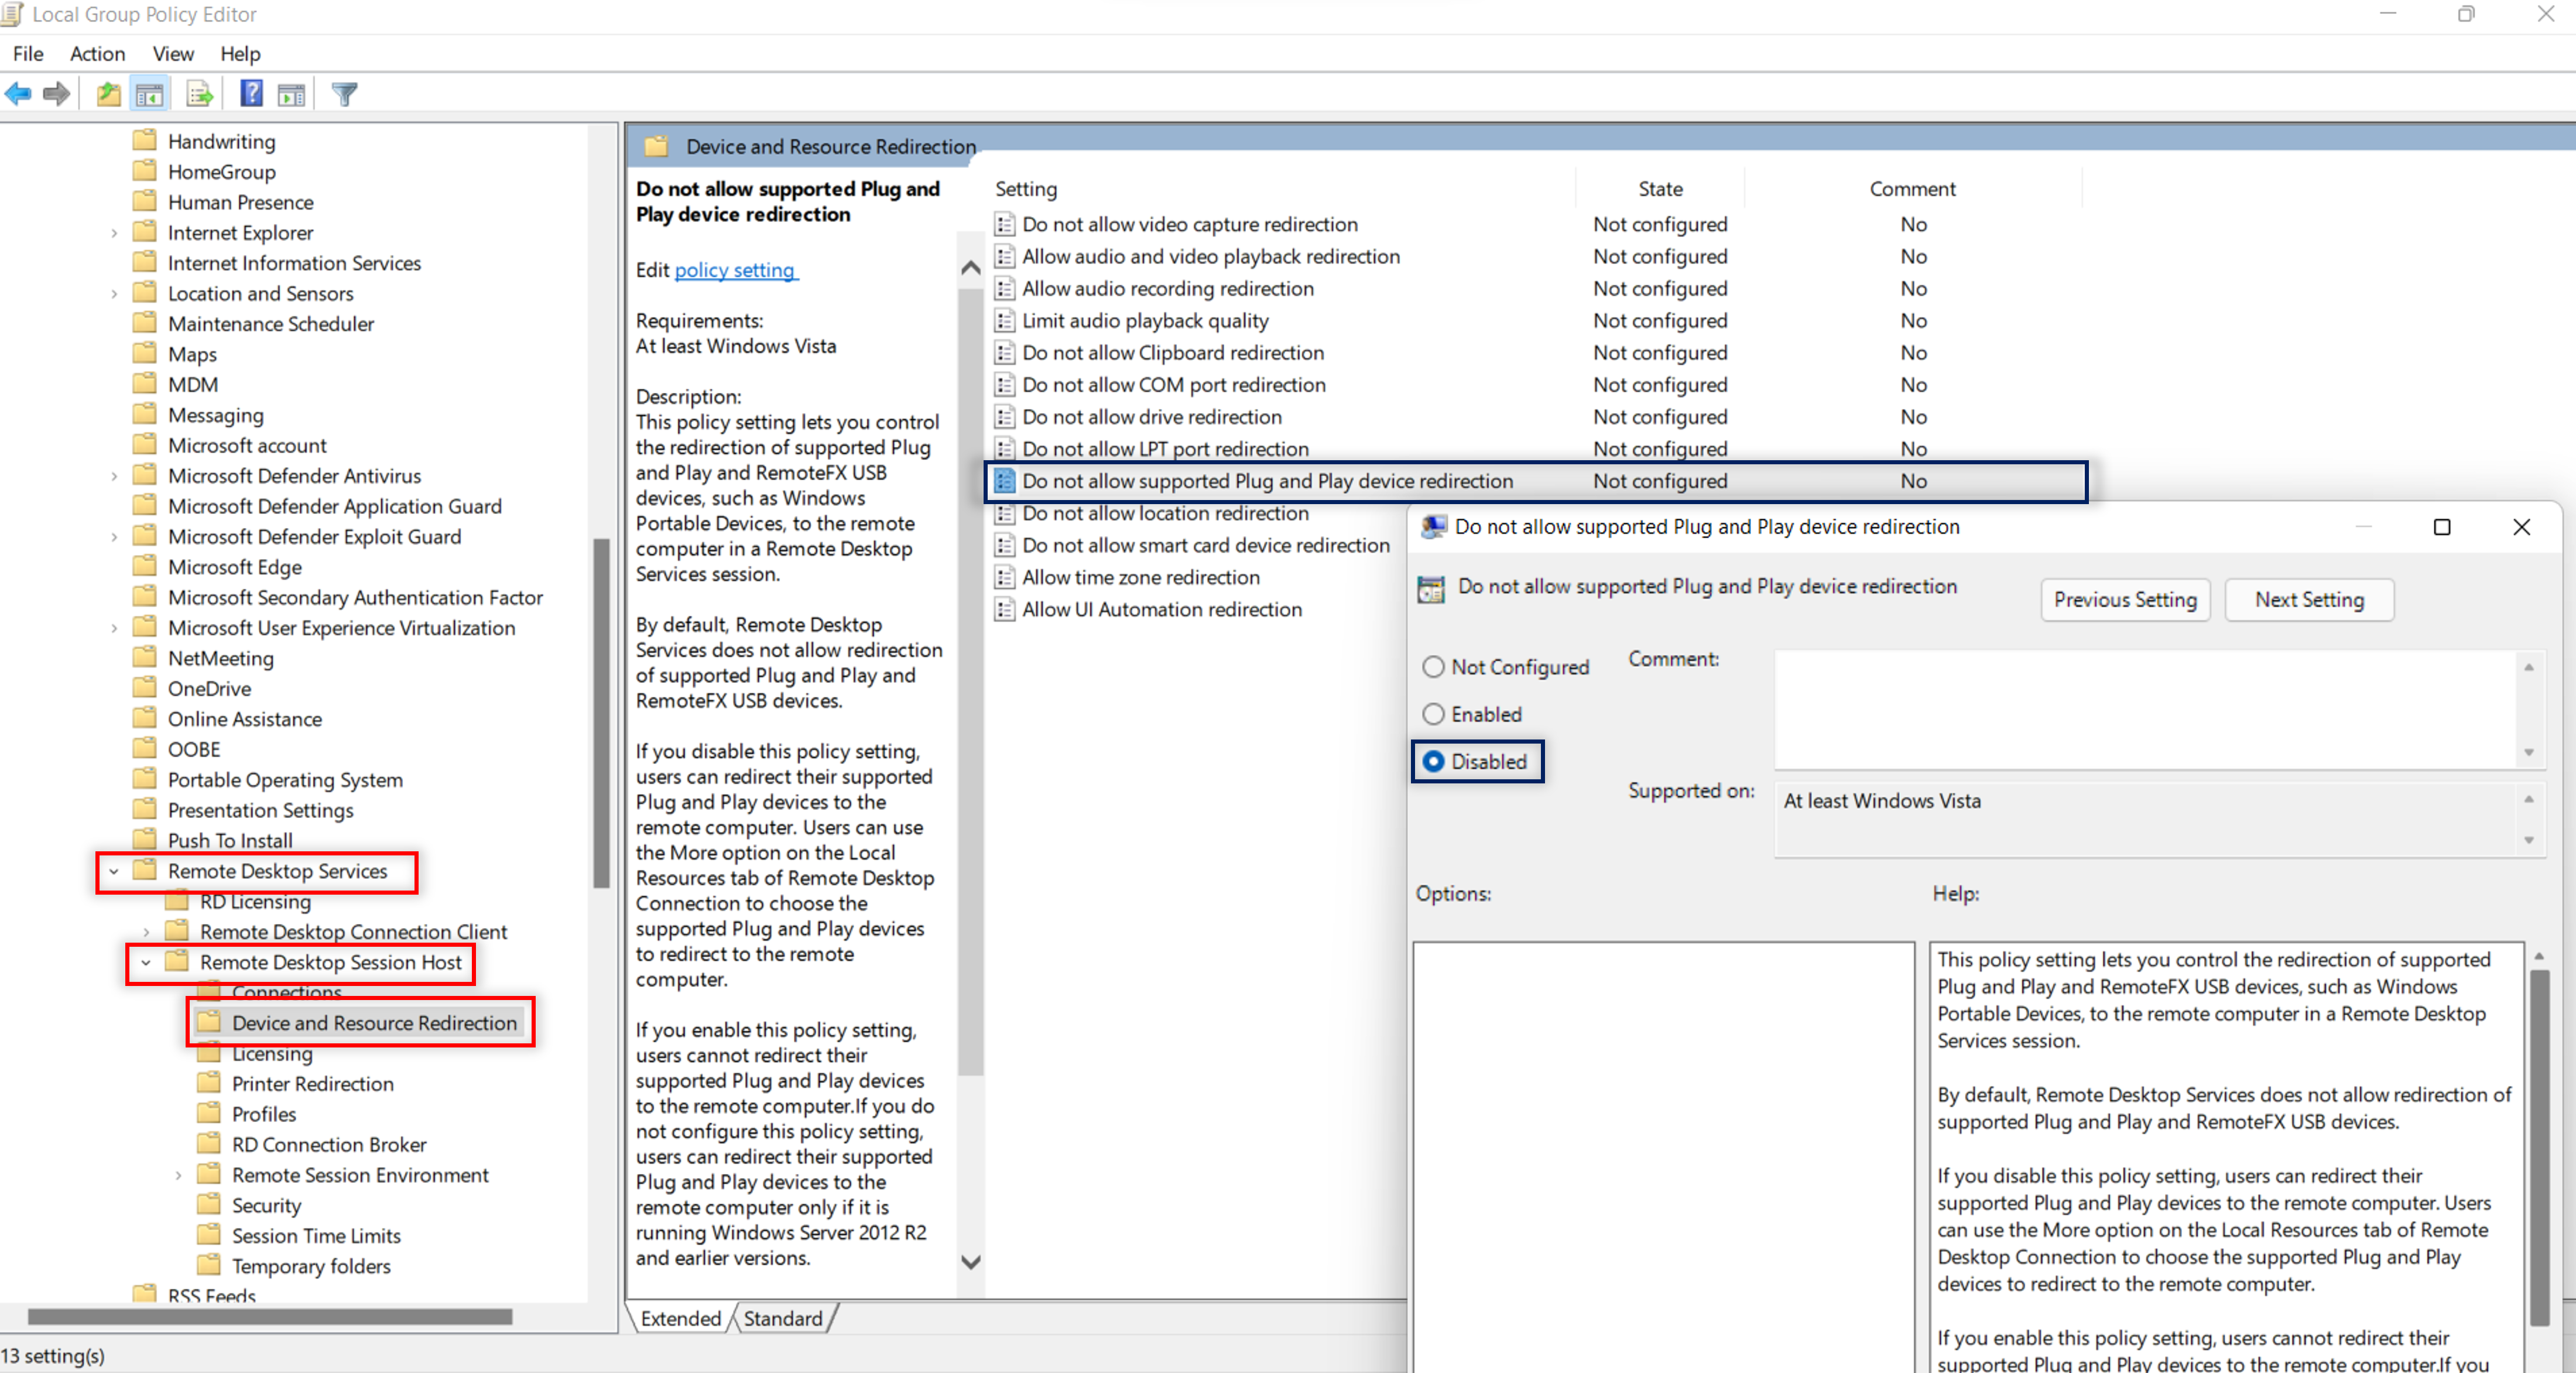
- Choose the Disabled option and click OK in the pop-up window as shown below.disabled do not allow plug and play device redirection
Note: Yes, it’s Disabled. Double negative. 🫣
- Next navigte to Computer Configuration > Administrative Templates > Windows Components > Remote Desktop Services > Remote Desktop Services Session Host > Remote Session Environment > RemoteFX for Windows Server 2008 R2. Open Configure RemoteFX and select Enabled
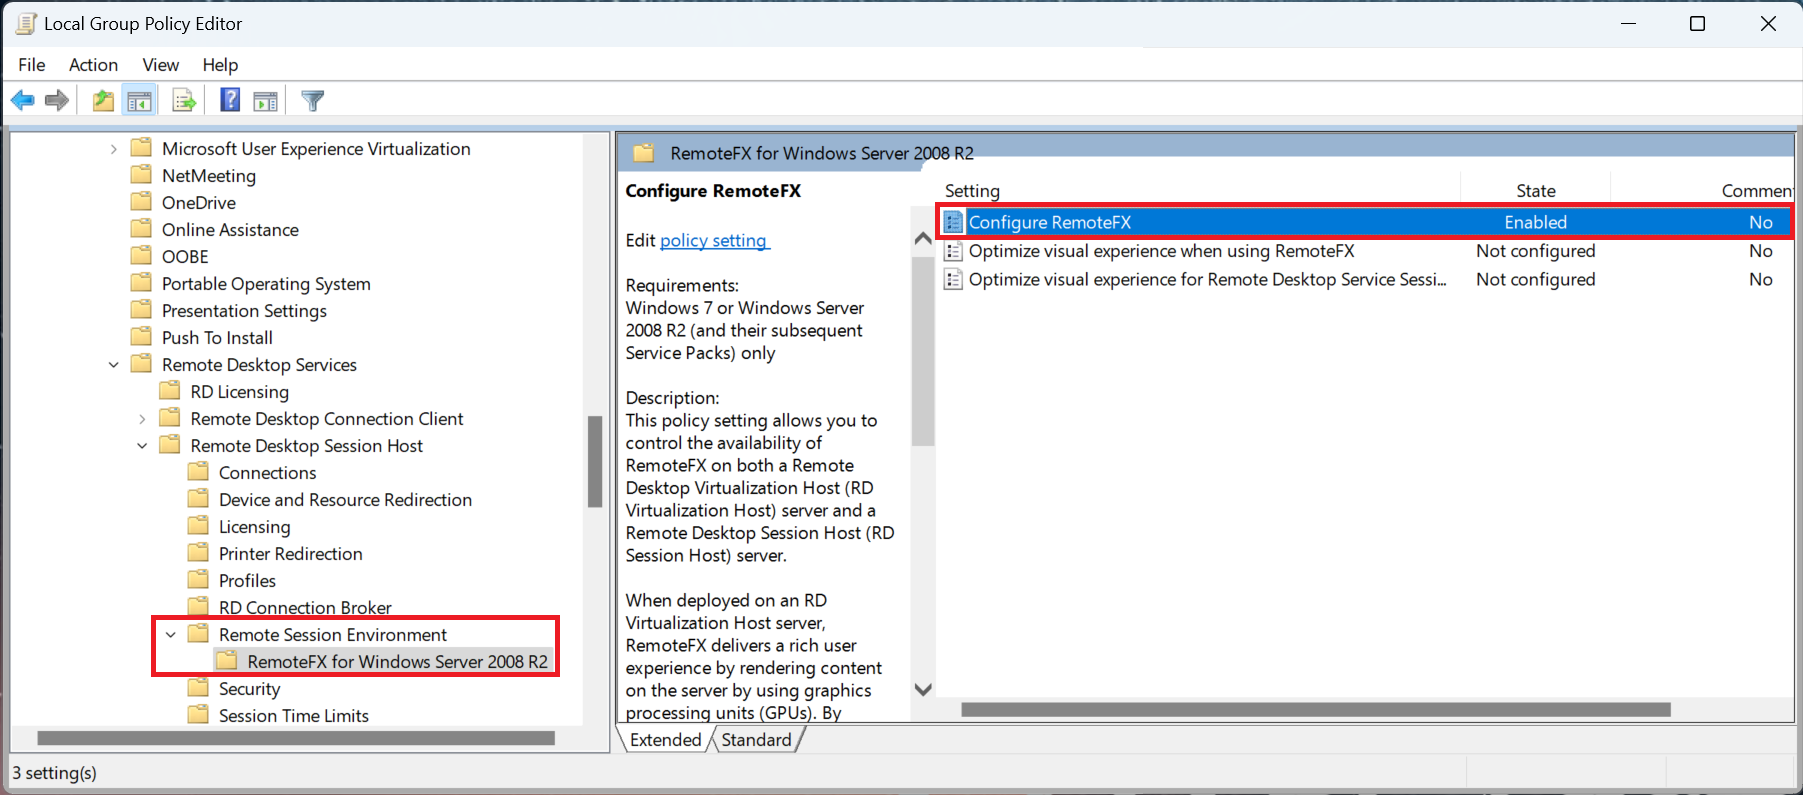
- Restart your session host or Cloud PC to apply the changes.
Note: Of course, you can use the Group Policy Management to configure this settings via Active Directory Group Policies 😊. After creating and configuring a new policy, link the policy to the Organizational Unit of the target machine’s location or you use Microsoft Intune to configure this settings.

Note: You can set this via PowerShell.
    $RegistryPath = "HKLM:\SOFTWARE\Policies\Microsoft\Windows NT\Terminal Services"
    Set-ItemProperty -Path $RegistryPath -Name "fEnableVirtualizedGraphics" -Value 1 -Type DWord
    Set-ItemProperty -Path $RegistryPath -Name "fDisablePNPRedir" -Value 0 -Type DWord
    Restart-Computer -Force
Enable RemoteFX USB redirection on your local windows device
The RemoteFX USB redirection feature is disabled by default so lets enable it.
-
On your client run gpedit.msc.
-
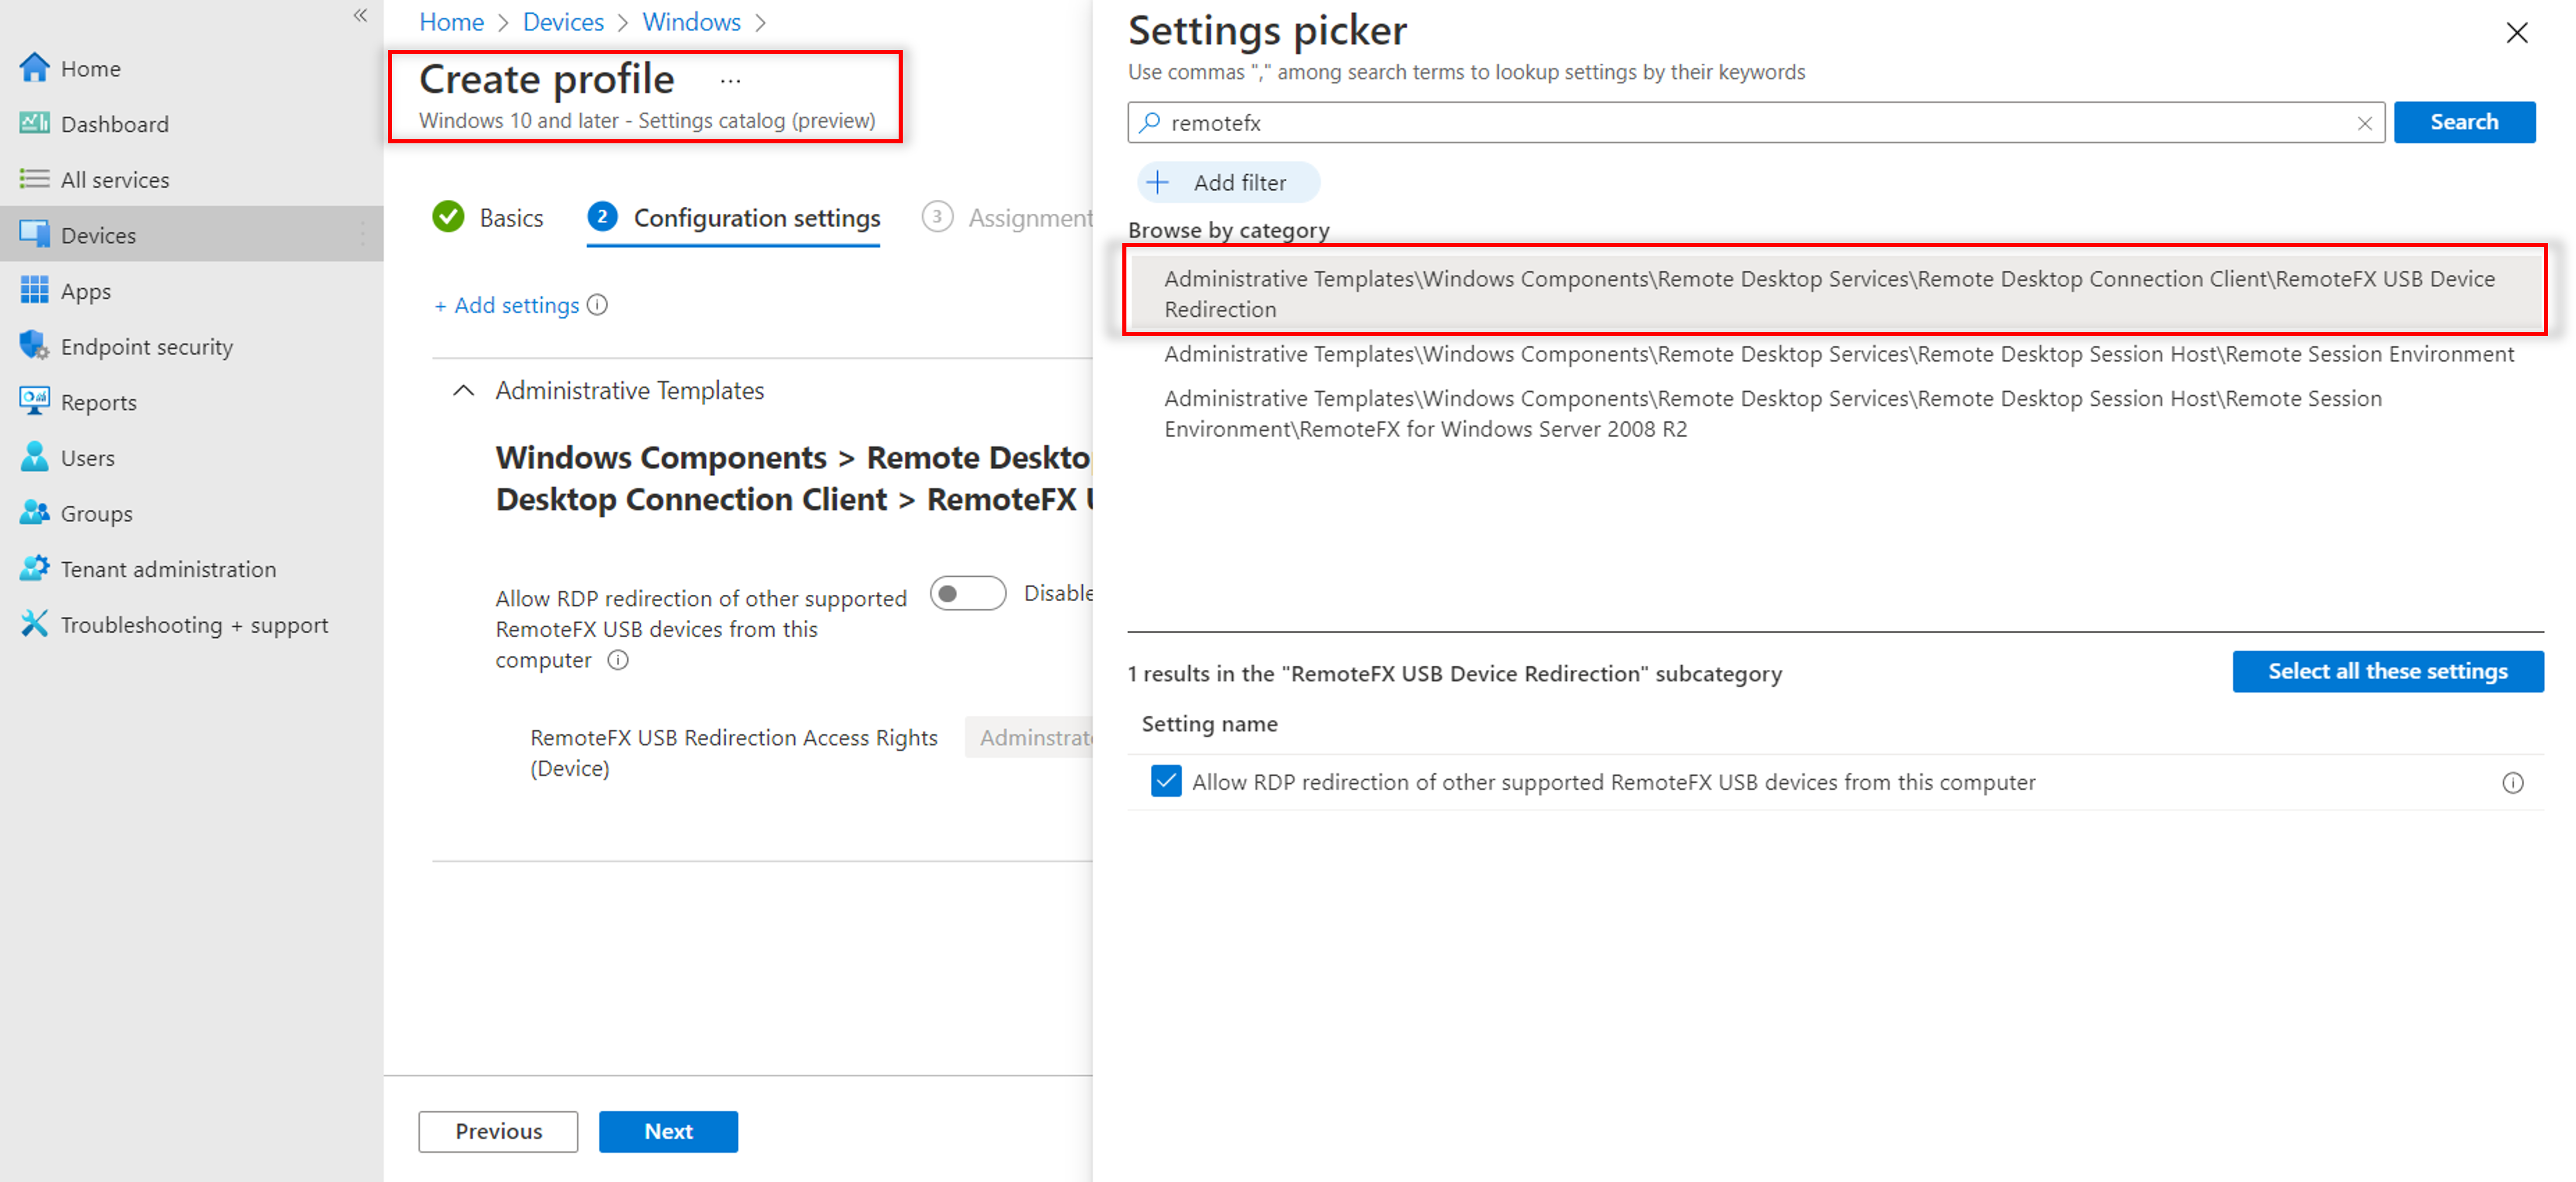
Open: Computer Configuration\Administrative Templates\Windows Components\Remote Desktop Services\Remote Desktop Connection Client\RemoteFX USB Redirection.
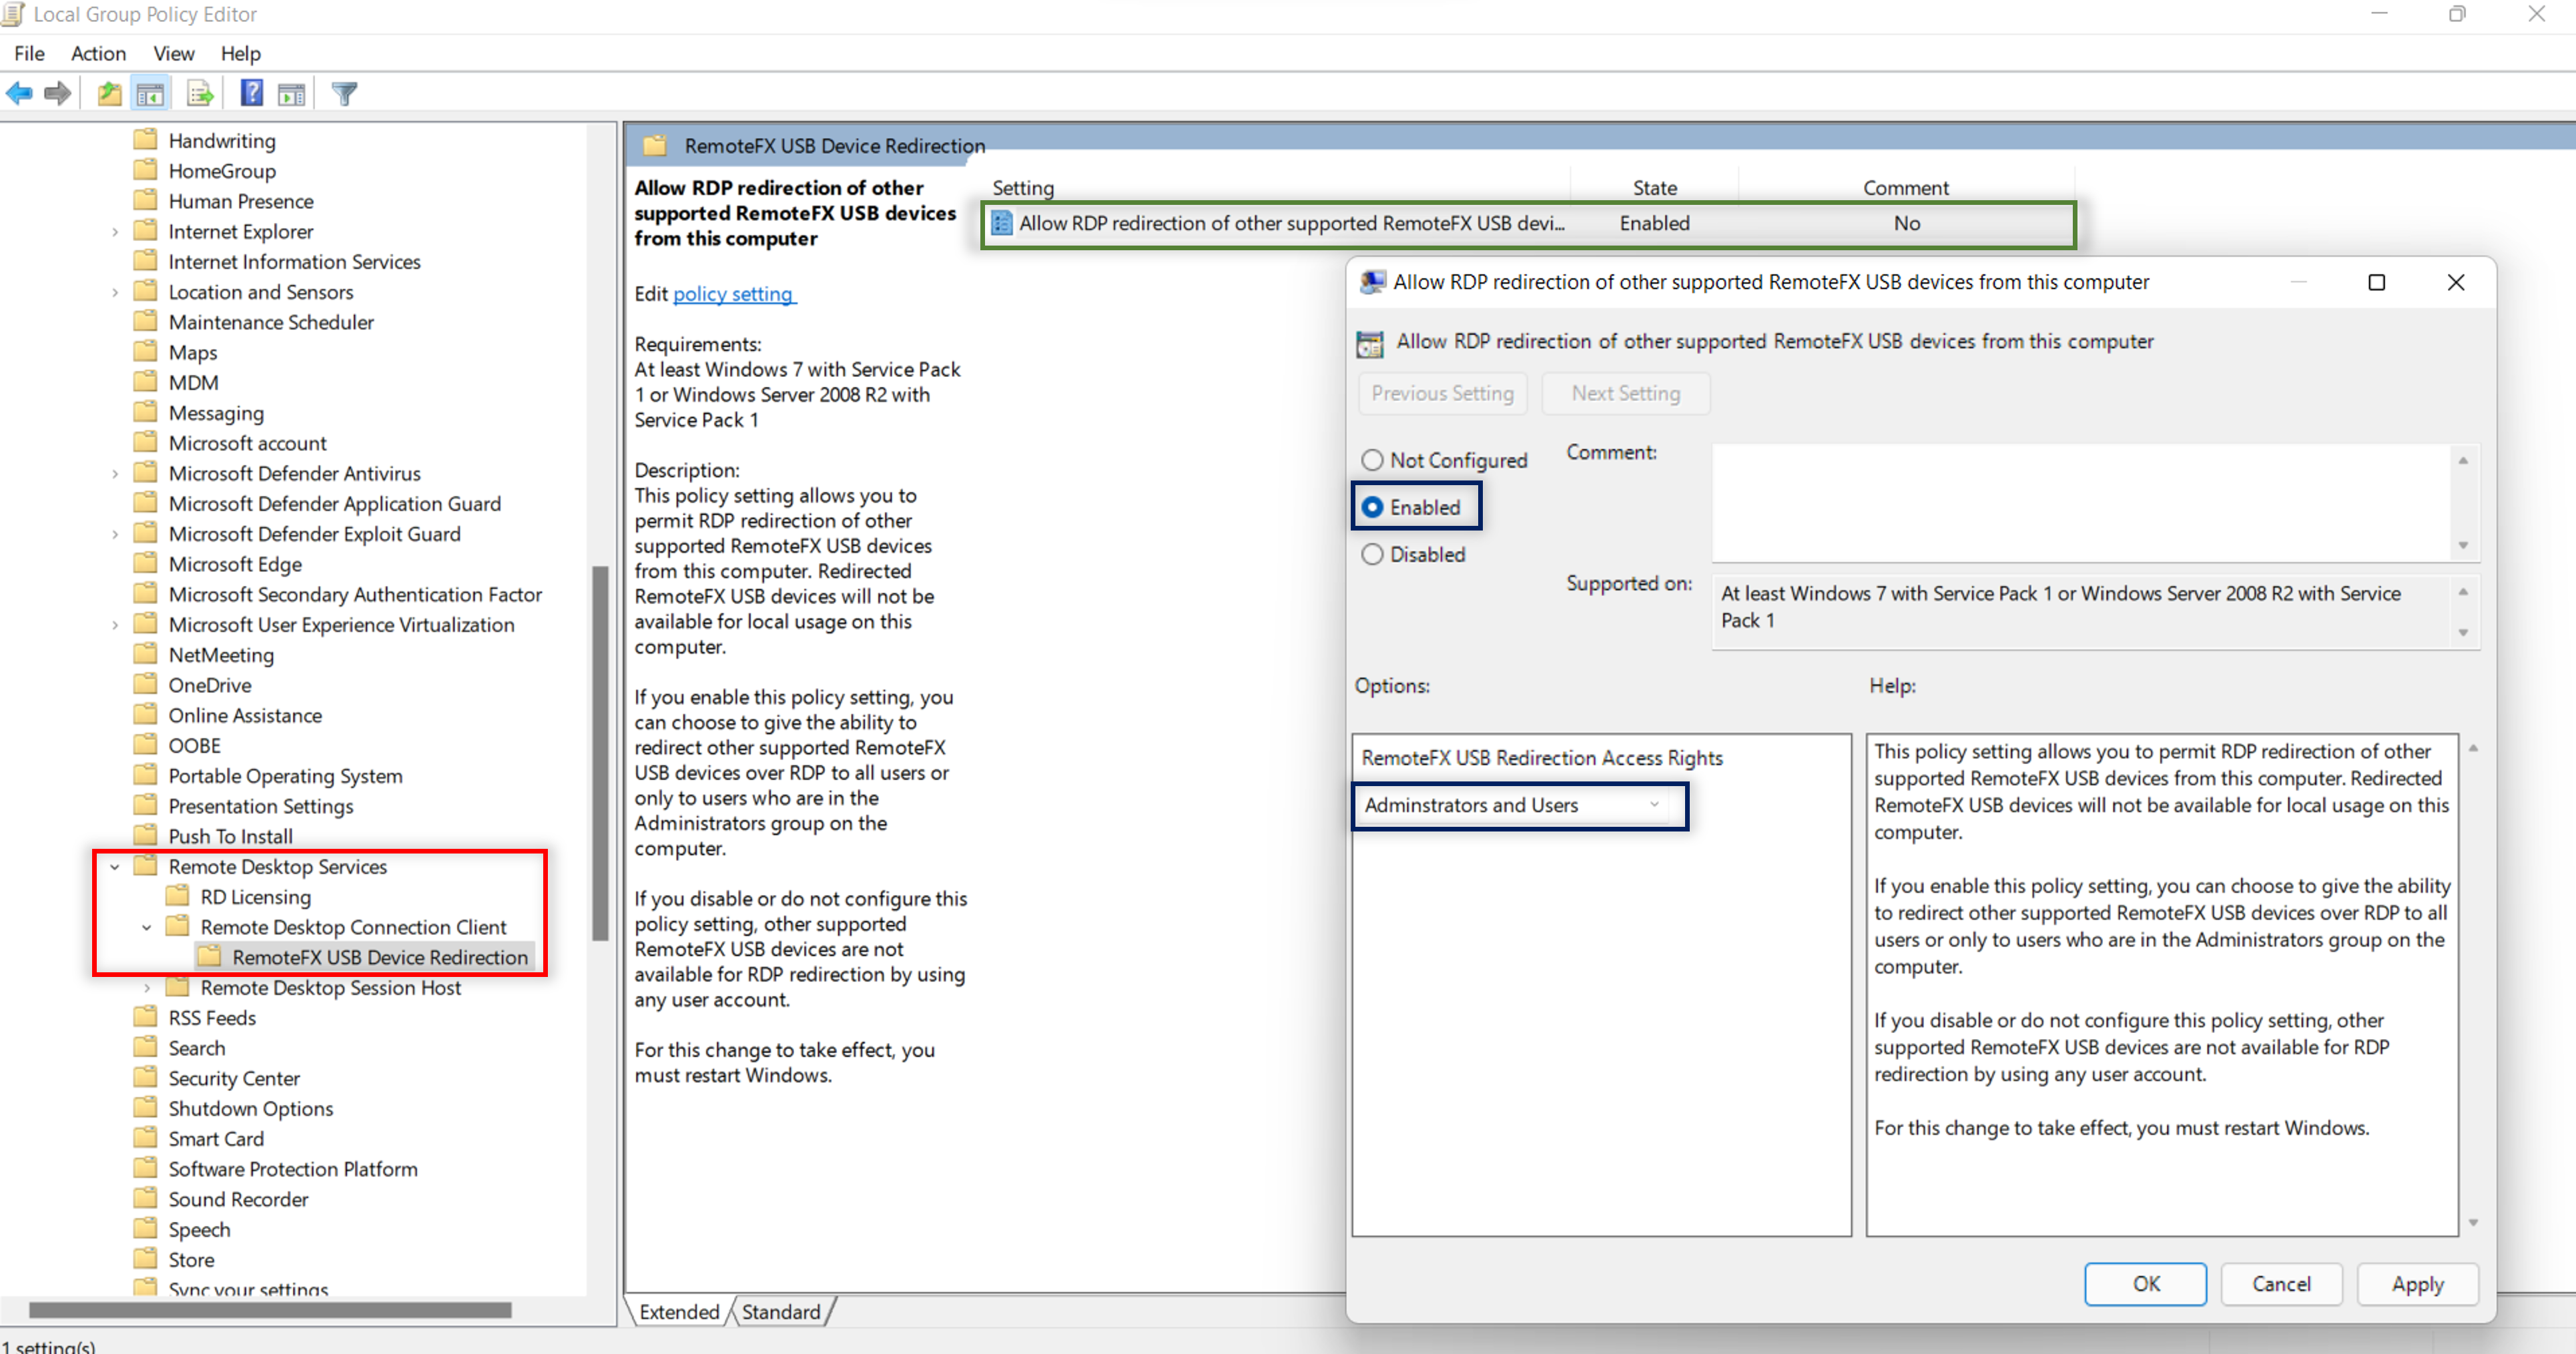
-
Set Allow RDP redirection of other supported RemoteFX USB devices from this computer to Enabled and select Administrators and Users. Click OK and finish the configuration.
-
Finally run gpupdate /force to update the machine’s policy.
Note: Of course, you can use the Group Policy Management to configure this settings via Active Directory Group Policies 😊. After creating and configuring a new policy, link the policy to the Organizational Unit of the target machine’s location or you use Microsoft Intune to configure this settings.
Note: You can set this via PowerShell.
    $RegistryPath = "HKLM\SOFTWARE\Policies\Microsoft\Windows NT\Terminal Services\Client"
    Set-ItemProperty -Path $RegistryPath -Name "fUsbRedirectionEnableMode" -Value 2 -Type DWord
    Restart-Computer -Force
Testing
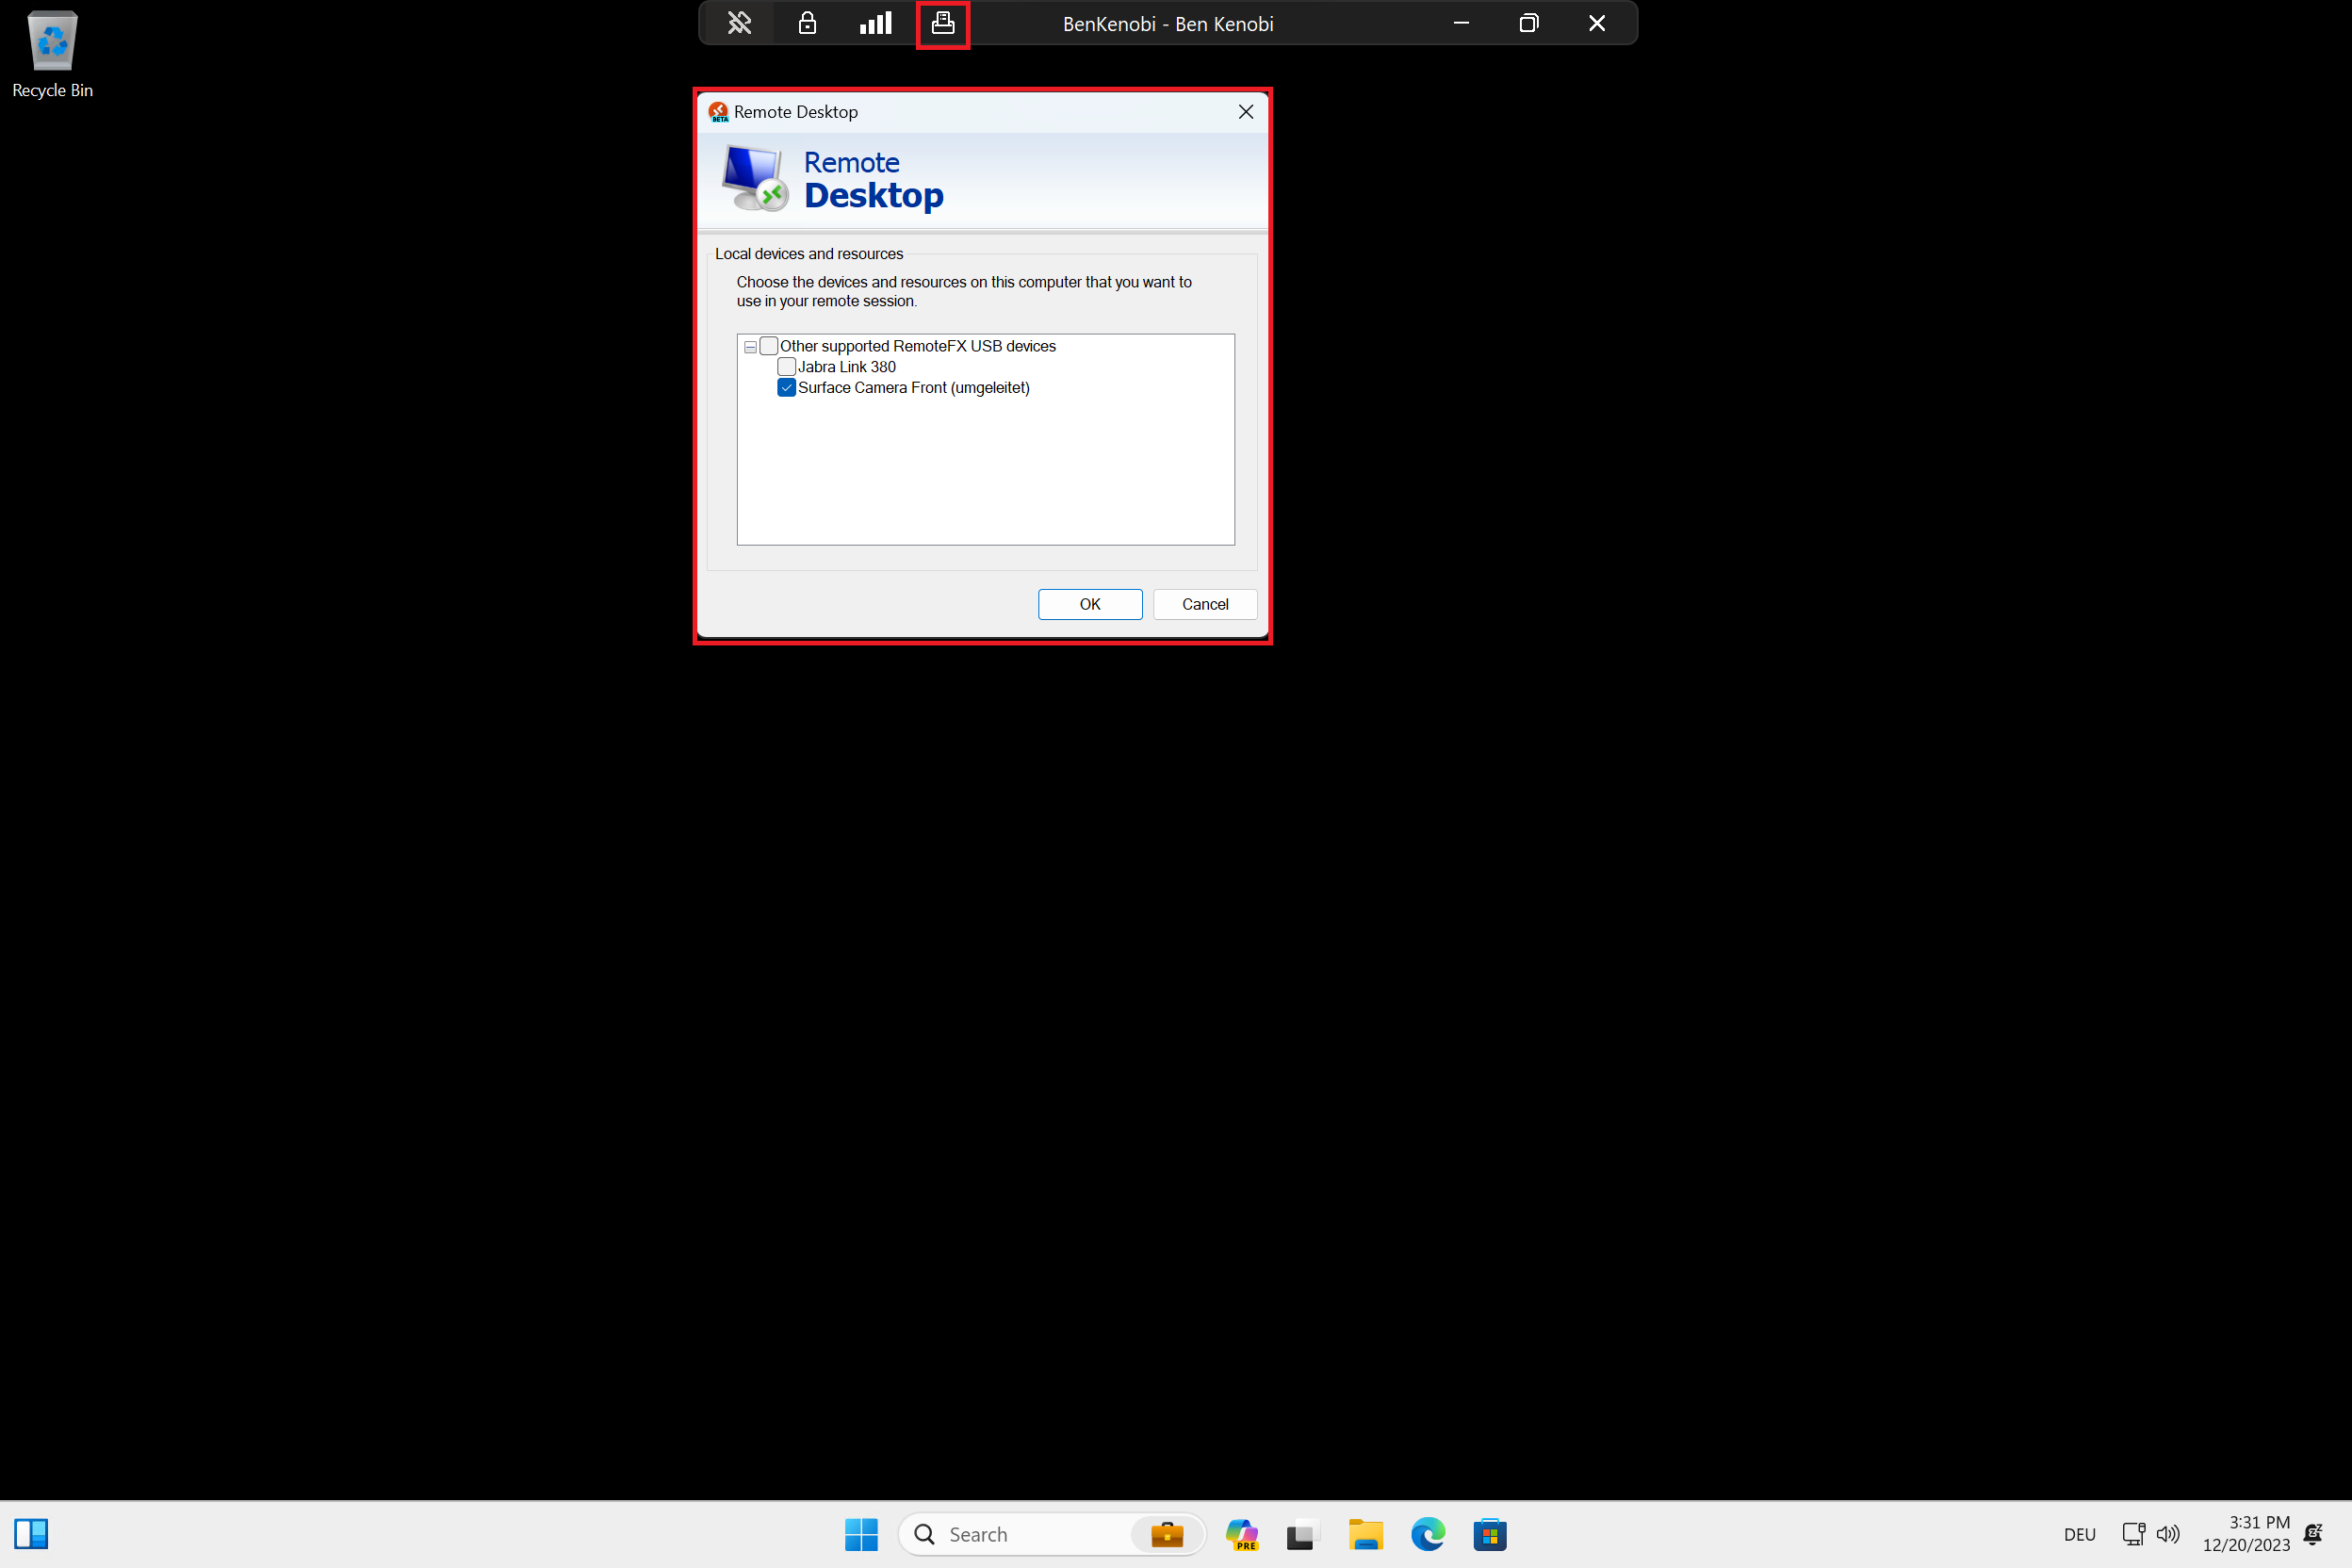
Last but least, Connect via a Remote Desktop Client (Azure Virtual Desktop, Windows 365 or Windows App) to your session host or Cloud PC. You will see a new icon in the connection bar to connect your #USBDEVICE. Make sure it’s not in use by any local application.
Devices can’t be used on both local devices and the remote session simultaneously. A device can either be mapped locally or into the virtual desktop. And make sure you install the driver on the virtual desktop in case the device is not a “plug and play” device.
Conclusion
Daniel Weppeler and myself had quite alt of design, engineering and graphic intense engagement lately and this settings absolutly increase the user experience.
RemoteFX acts as a catch-all mechanism that redirects these USB devices! Unlike high-level redirections such as drive redirection, RemoteFX USB redirection happens at the port protocol level, and is similar to how one can redirect serial or parallel ports via RDP.
RemoteFX USB redirection is meant to supplement high-level redirections, not to supplant them. By combining RemoteFX USB redirection with RDP high-level device redirections, you can have the best of both worlds.