Azure Virtual Desktop x Shutdown and deallocate Session host at logoff
Azure Virtual Desktop (#AVD) x Shutdown and deallocate Session host at logoff
Table of contents
Introduction
Azure Virtual Desktop (AVD) costs come from two sources: underlying Azure resource consumption and licensing.
In the cloud, we want to “Do More, With Less” and maximize the efficiency, ROI and costs of our cloud environment. For AVD this means; the less users are connected to their personal session hosts, the less compute resources should be allocated.
In this article, we’ll explain how to automatically deallocate unused personal VMs to increase your cost optimization score.
If you are optimizing pooled or multi session deployments, please take a closer look at the AVD Scaling Plan feature.
Components and workflow
To deallocate virtual machines we use:
To interrupt the deallocation process we use:
- the Windows Task Scheduler
To start the session host again we use:
- the Azure Virtual Desktop Start VM on Connect feature.
Lastly, all remote desktop environment settings are done via:
- GPO
- Intune or
- directly via Regkey
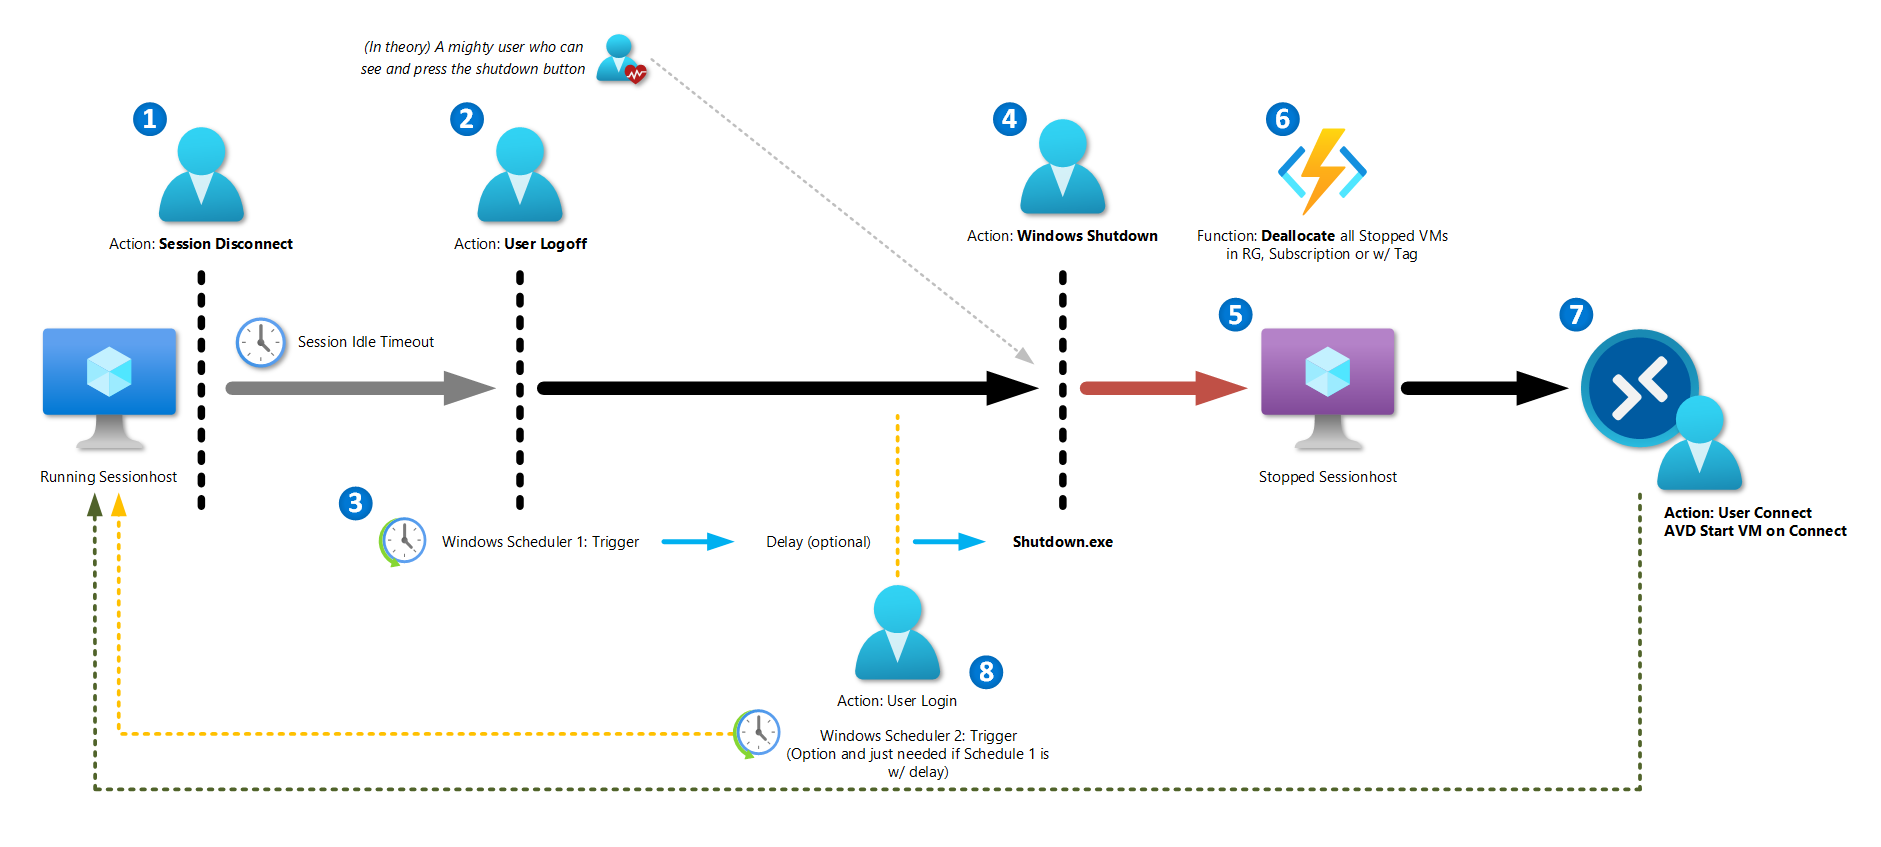
This image shows the deallocation workflow:
-
You can limit the amount of time that active, disconnected, and idle (without user input) sessions remain on the server. The configuration of Timeout and Reconnection Settings for Remote Desktop Services Sessions is documented here.
-
When a user triggers the logoff or the idle time period is reached and the logoff is executed, a scheduled task is triggered.
-
The scheduled task is triggers the Windows Shutdown and can be delayed e.g. for 15min.
-
After defined shutdown delay, the triggered task is initiating the Windows Shutdown.
-
As soon as the shutdown is triggered, the session host virtual machines will be in the Stopped state
-
An Azure Function will deallocate all VMs with the state Stopped
-
AVD Start VM On Connect will enable the end users to turn on their session host virtual machines when they need them.
-
If a user is triggering a logon while in phase 2. or 3. we terminate the scheduled shutdown task and wait for the next logoff to be triggered.
Setup shutdown and deallocation on disconnect
By default, AVD session hosts virtual machines (VMs) and Remote Desktop Services allows users to disconnect from a remote session without logging off and ending the session. When a session is in a disconnected state, running programs are kept active even though the user is no longer actively connected. To enable RDP Timeouts for idle session and disconnection you can use one of the following options.
Enable RDP Timeouts
There are several options to enable RDP timeouts. Here you will learn 3 options: via Intune settings catalog, via Active Directoy Group policies and via registry key.
Via Intune Settings Catalog
-
First, open the Intune site (in.cmd.ms) and then you need to create a new Device Configration profile or use a existing profile to add the RDP timeout settings. The configuration profile can be created in profile type templates or in the settings catalog. The next steps show the RDP settings via settings catalog.
-
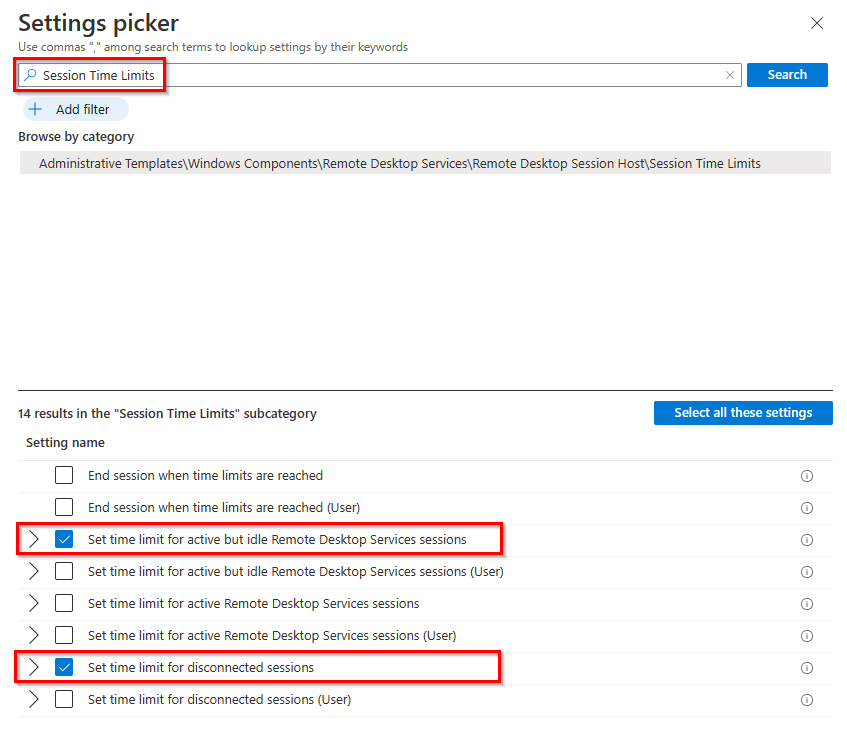
Next, search for “Session Time Limits” in the settings picker and add the settings “Set time limit for active but idle Remote Desktop Services sessions” and “Set time limit for disconnected sessions” to your configuration profile.
Note: These RDP timeout settings are available as computer and user settings.
- Now you need to activate these settings and set your preferred timeouts.
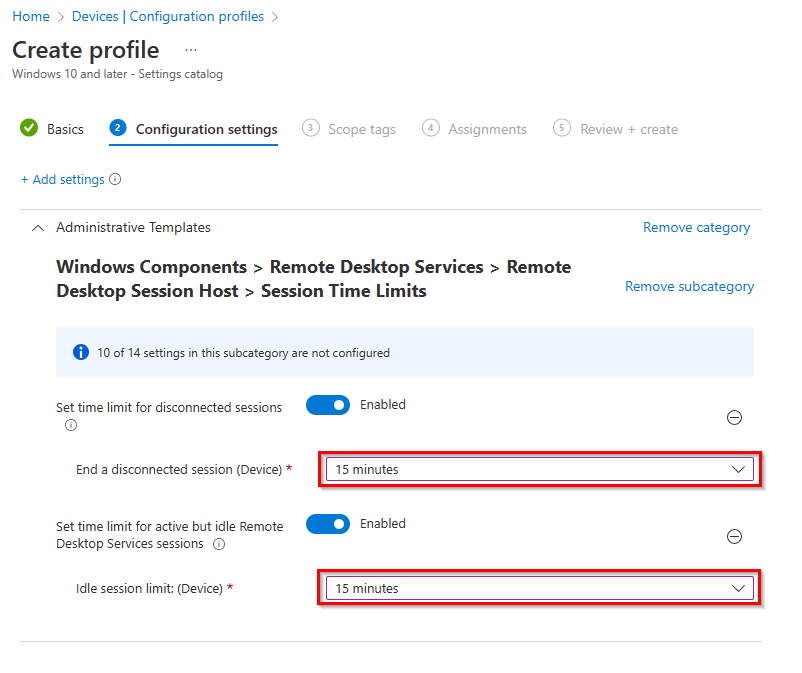
- Then assign the Intune device configuration to a device or user group, depending on whether you select the device or user setting.
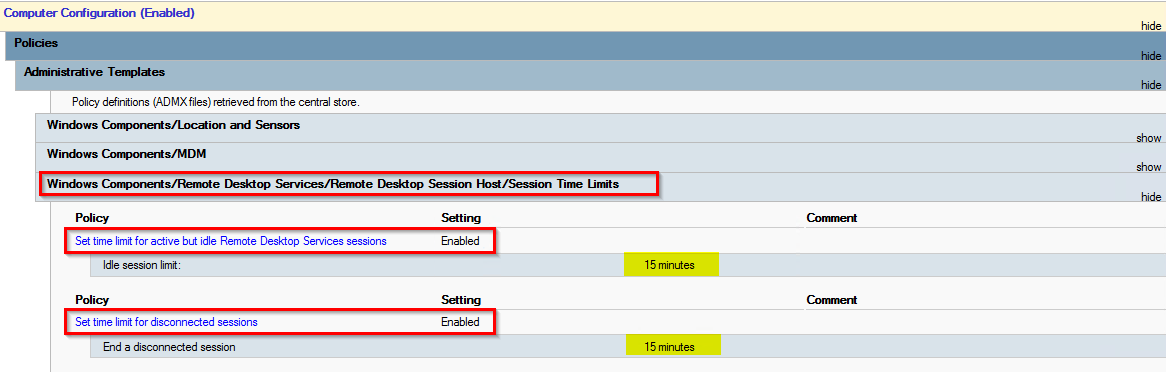
Via Active Directoy Group policies
You can find the RDP timeout settings under the following path in the GPO editor:
Computer Configuration/Administrative Templates/Windows Components/Remote Desktop Services/Remote Desktop Session Host/Session Time Limits
Via Registry Key
You can use the following PowerShell commands to add the RDP timeouts by adding two registry keys. The value in milliseconds must be specified in hex format, e.g. 0x000dbba0 = 900000ms = 15mins.
Note: You can use the PowerShell function ‘{0:x}’ -f [number in ms] to convert from decimal to hex.
$registryPath = "HKLM:\Software\Policies\Microsoft\Windows NT\Terminal Services"
$Name = "MaxDisconnectionTime"
$value = '0x000dbba0'
New-ItemProperty -Path $registryPath -Name $name -Value $value -PropertyType DWORD -Force | Out-Null
$Name = "MaxIdleTime"
$value = '0x000dbba0'
New-ItemProperty -Path $registryPath -Name $name -Value $value -PropertyType DWORD -Force | Out-Null
Create an Azure Function to deallocate all stopped VMs
Azure continues to charge for the VM core hours while it’s Stopped. As soon as the VM is deallocated, you just pay for the storage e.g. OS disk and any attached data disks.
So next let’s build a function to deallocate all VMs with the Stopped state.
-
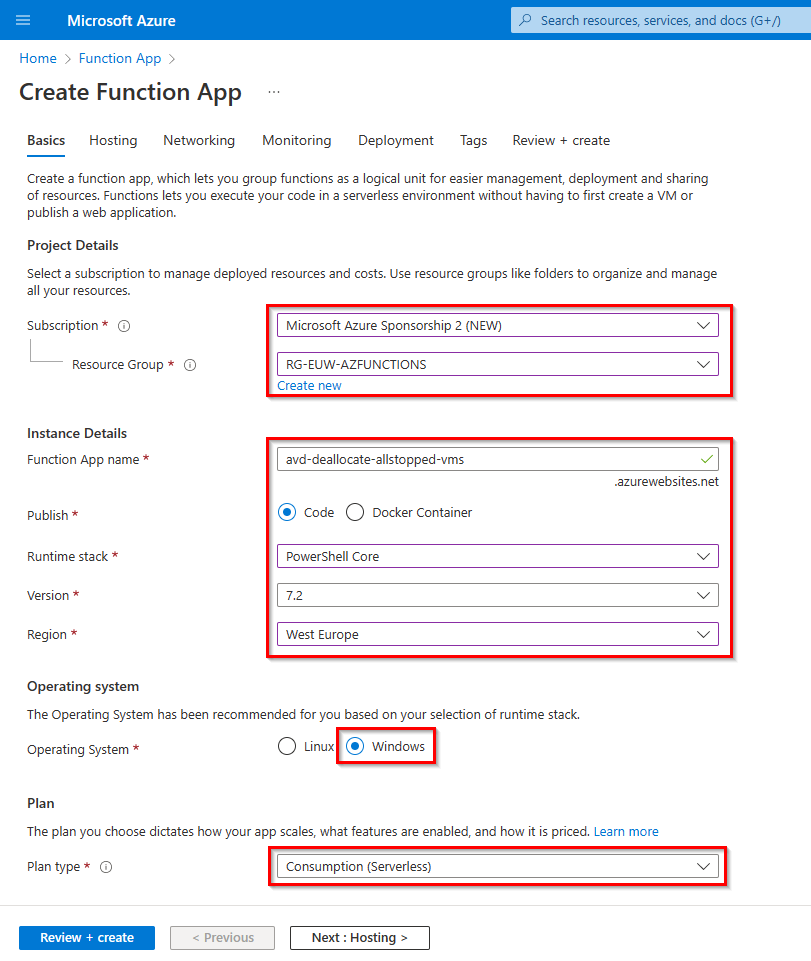
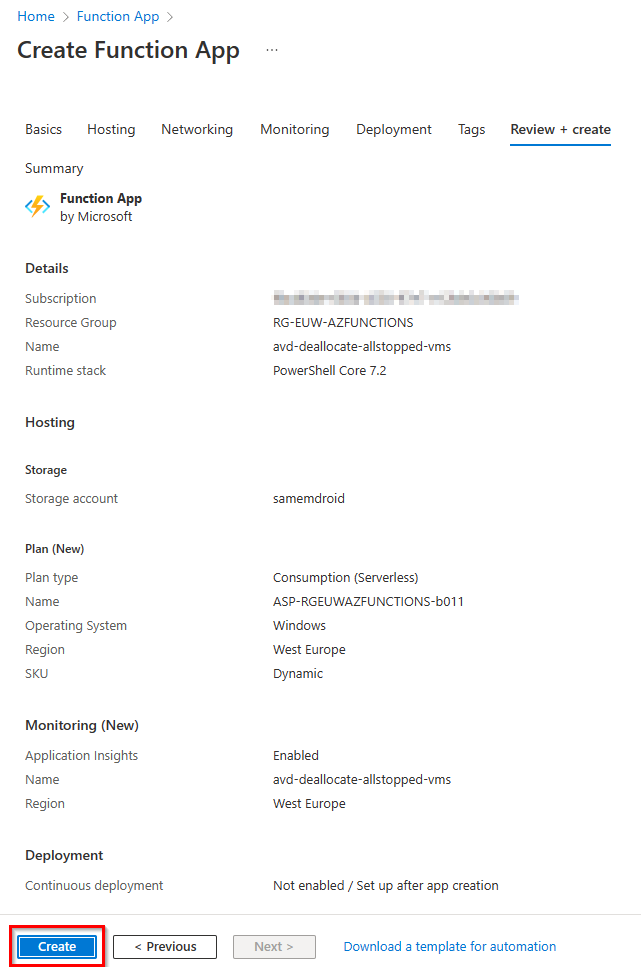
Open the Azure Function page, you can use this direct link: https://azfn.cmd.ms/, then click Create to crate a new Azure function resource.
-
Select your project details (subscription/resource group) and then select a unique Azure function name, select PowerShell Core as runtime stack and your preferred region. For the operating system, select Windows and the plan type should be Consumption (Serverless).
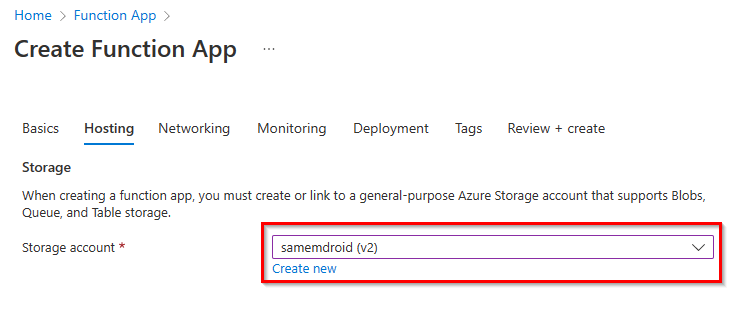
- Next, on the Hosting tab, select your preferred storage account or create a new one.
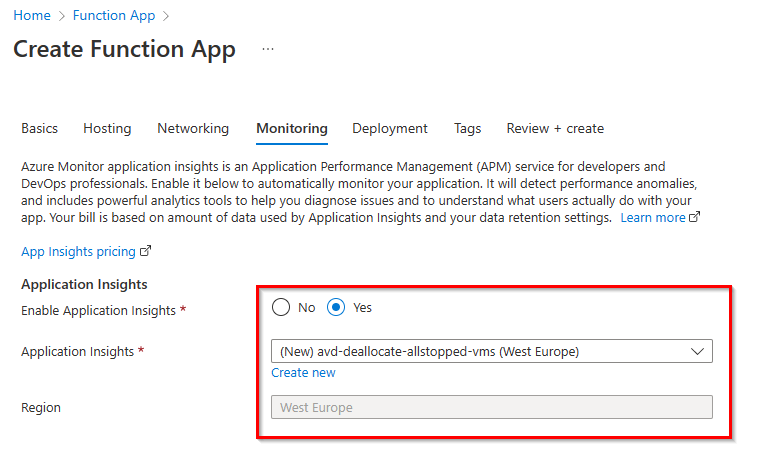
- Next, you can skip the Network tab because of the limitation of the service plan. Go to the next tab Monitoring and enable it to get more insights into the applications if you want. This is not required, but it will help if a problem occurs.
Note: Here you will find some information about Application Insights.
- The Deploy tab can also be skipped and then you can assign some tags if you want. Otherwise, click Check + Create.
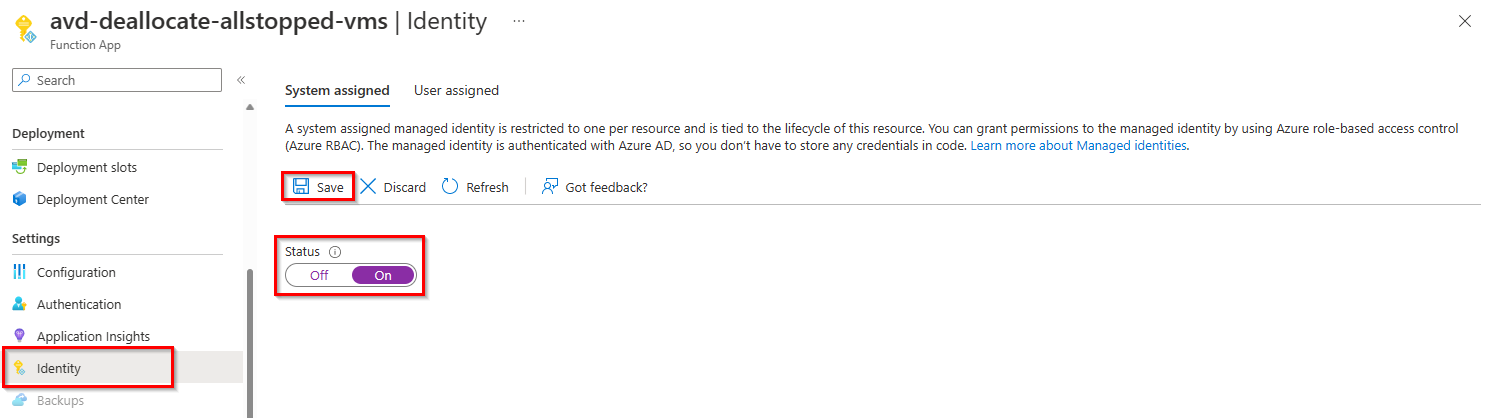
- When the Azure function is successfully created, access the resource. First, you need to enable a system-assigned managed identity and assign an Azure permission role that enables virtual machine shutdown. Open Identity Settings and change the status for the assigned system from Off to On, and then click Save.
This registers the Azure function in Azure Active Directoy so that you can assign specific Azure permissions to this managed identity. Alternatively, you can use a user-assigned managed identity instead of a system-assigned one if you wish.
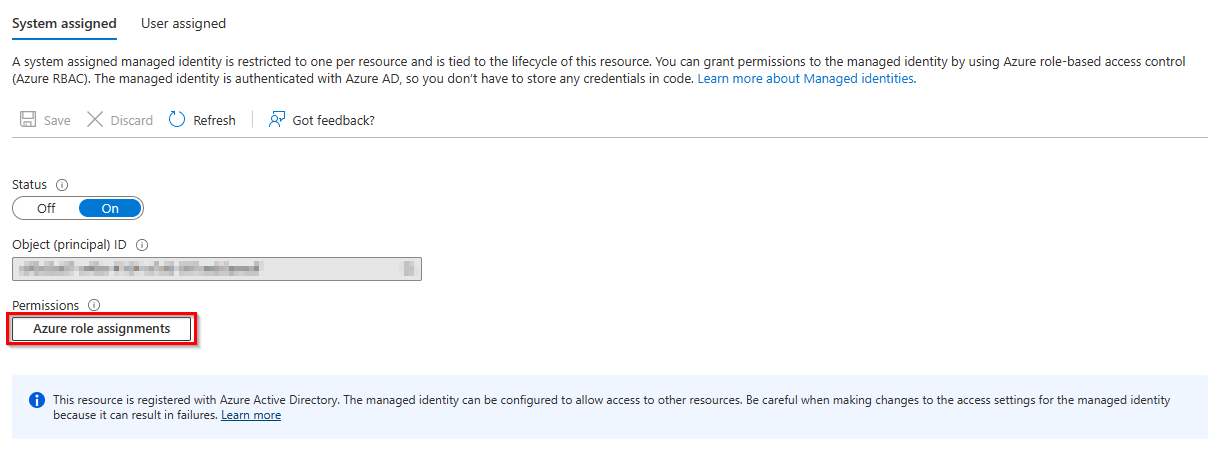
- Now you can assign Azure permissions to this managed identity. Click Azure Role Assignments and then click Add Role Assignment.
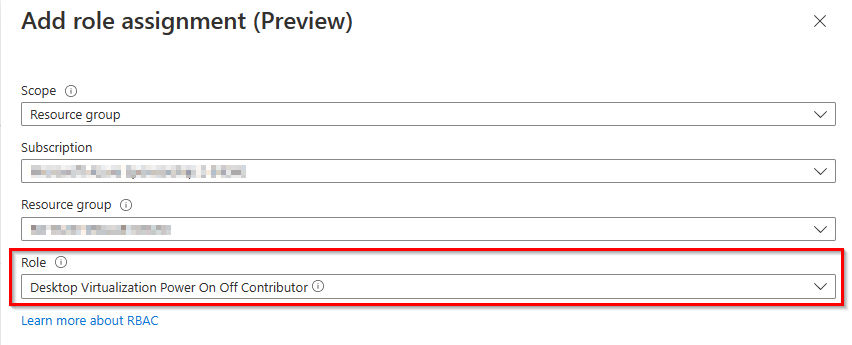
If you want to use this Azure feature only for a specific resource group, select Resource group as scope and your Subscription/Resource group However, if you want to use it for the entire subscription, select Subscription as Scope.
Meanwhile, there is a built-in permission role that allows you to start and deallocate virtual machines. You can use your custom role if you have one, otherwise select the Desktop Virtualization Power On Off Contributor role. The same role is also used for the scaling plan feature.
- Next, open the Azure function Configuration in the Settings section, as you will need to add a new application setting that defines the resource group.
Click New Application Setting and enter ResourceGroupName as the application setting name and your value, which should be the resource group where your personal AVD session hosts are stored.
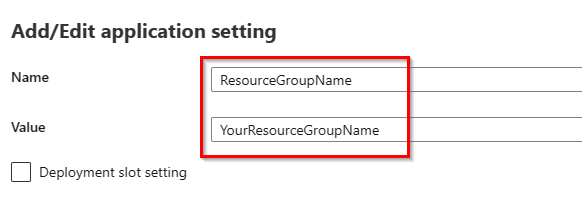
Click OK and then click Save.
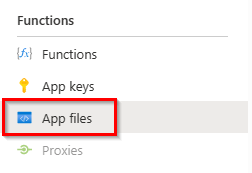
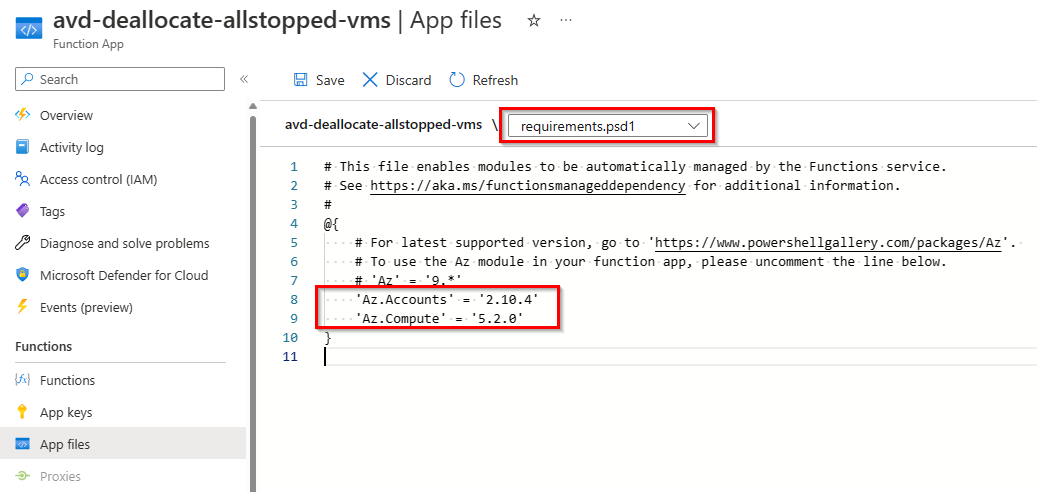
- For our PowerShell script, some modules are required so that we can log in to Azure and stop some virtual machines. Therefore these modules must be added to the file requirements.psd1. For this you have to open App files under the functions section and then select requirements.psd1.
Add this lines and then click Save:
    'Az.Accounts' = '2.10.4'
    'Az.Compute' = '5.2.0'
- After you change the app file for the PowerShell modules, you need to restart the entire Azure function. To do this, select Overview and click Restart.

- Now you need to create a function as a timer trigger so that the function is automatically executed every minute or every 5 minutes or whatever. Within your Azure functions, navigate to Function, then click Create and select Timer Trigger. Then enter a descriptive name for this function and the schedule, e.g. “*/60 * * *” for each minute.
Note: The following provides more details on how to define the schedule as NCRONTAB expressions: NCRONTAB expressions & examples
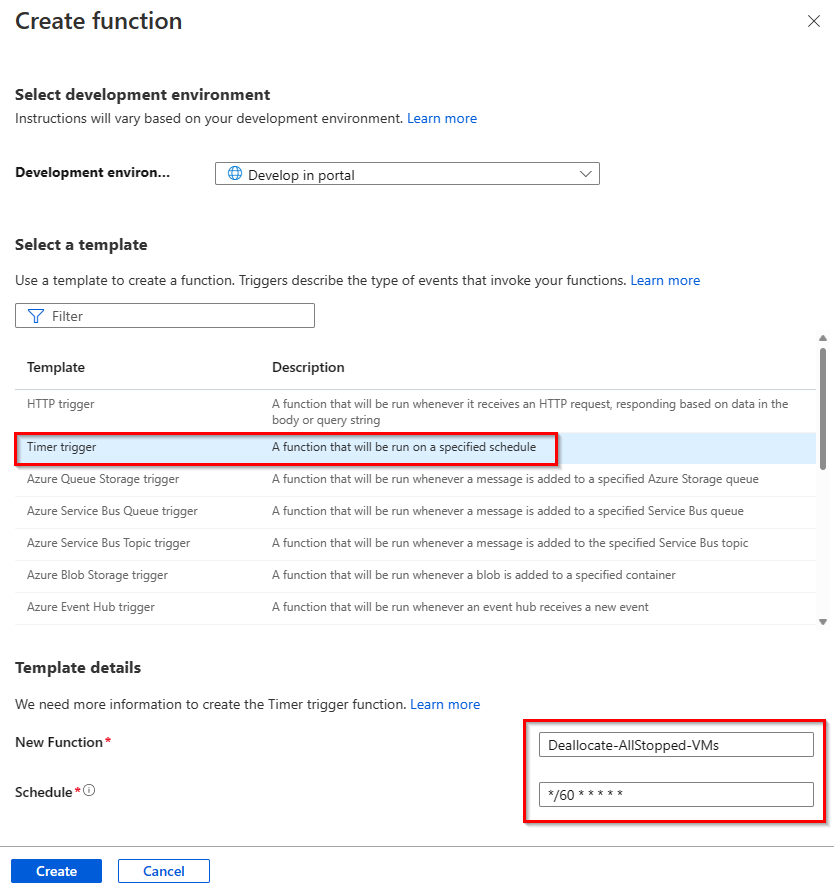
Click Create.
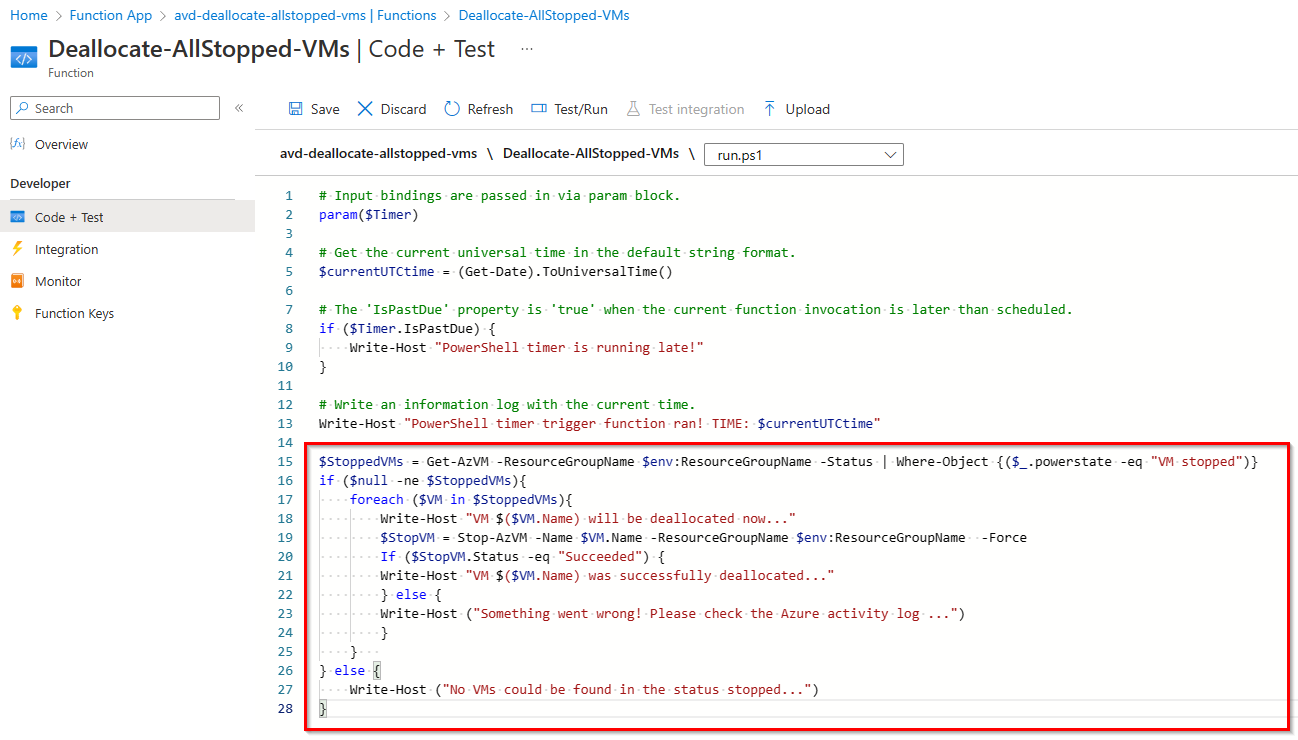
- Open Code + Test in the Developer section and select the PowerShell script run.ps1. Then add the following lines to the script and click Save.
$StoppedVMs = Get-AzVM -ResourceGroupName $env:ResourceGroupName -Status | Where-Object {($_.powerstate -eq "VM stopped")}
if ($null -ne $StoppedVMs){
    foreach ($VM in $StoppedVMs){
        Write-Host "VM $($VM.Name) will be deallocated now..."
        $StopVM = Stop-AzVM -Name $VM.Name -ResourceGroupName $env:ResourceGroupName  -Force
        If ($StopVM.Status -eq "Succeeded") {
        Write-Host "VM $($VM.Name) was successfully deallocated..."
        } else {
        Write-Host ("Something went wrong! Please check the Azure activity log ...")
        }
    }
} else {
    Write-Host ("No VMs could be found in the status stopped...")
}
Note: If you want to change the trigger time, open the function.json and change the schedule.
- Last step, you can try to run a test if everything is configured as excepted, e.g. Azure Permissions for the managed identity. Click Test/Run and then click Run. You should see all the script output in the logs terminal.
Warning: Please run this test in your developer resource group, because if everything is configured as exempt, the Azure feature will deallocate all stopped VMs.

Create Windows Task Scheduler for shutdown automation
After you have successfully created an Azure function to deallocate all suspended VMs, you need to create a scheduled task to run on the AVD session host.
First, let’s show what the scheduled task looks like, but you will need to implement the scheduled task as part of your imaging or provisioning process for new AVD session hosts. Below we have added the PowerShell commands to create this task automatically.
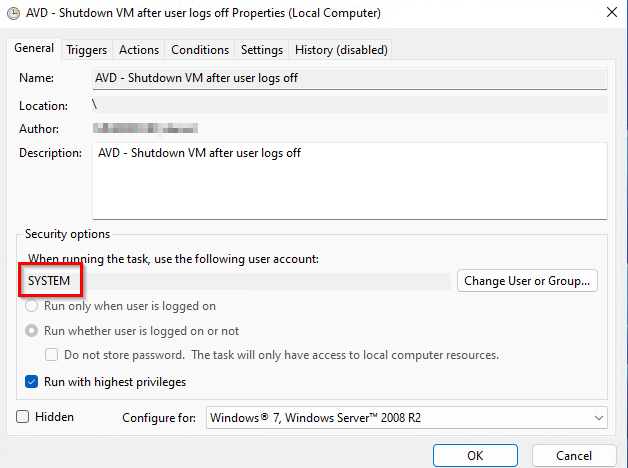
The scheduled task must run in a System Context and enable Execute with Highest Privileges.
As a trigger, you must select On Event and then Security as Protocol and 4647 as Event ID, which means that this task will be taken when this specific Event ID occurs.
Note: This task can be started with a delay, e.g. 15 minutes, but this is optional and not required.If you enable the delay, please follow the optional chapter.
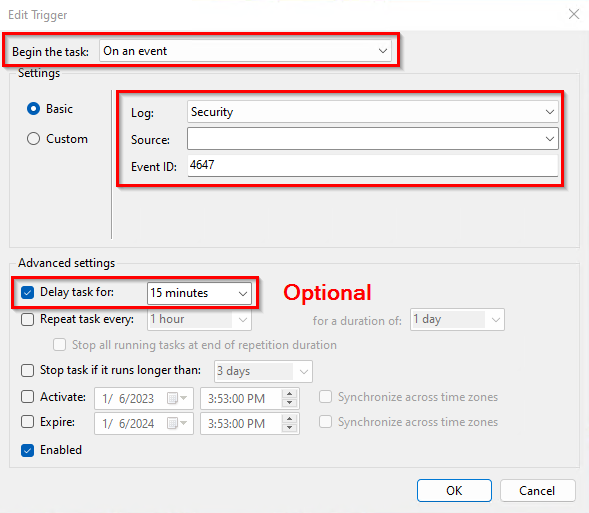
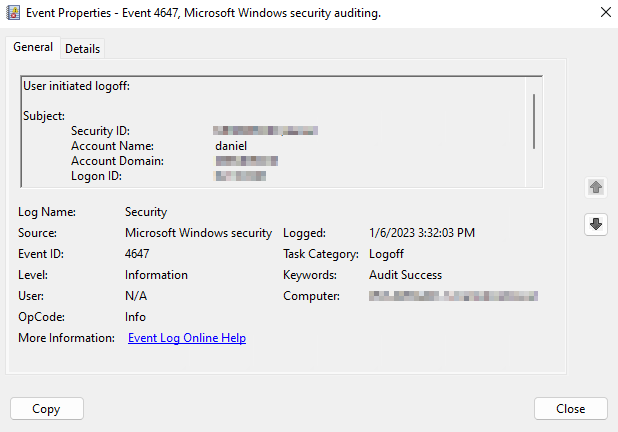
Event ID 4647 means that the user has initiated a logout, which can be achieved when the user clicks Sign out or the RDP connection disconnect timeout reaches its limit and logs the user out.
Next you need to define the action and select Start programme, enter the path of shutdown.exe (C:\Windows\System32\shutdown.exe) and add the arguments /f /s /t 0.
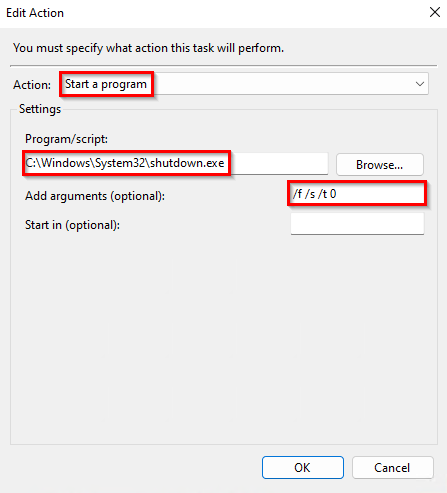
Warning: When you start this task, the system shuts down immediately. Before testing, make sure that all your configuration and work is saved.
The following PowerShell script lines create the scheduled task described above.
You can include these script lines for your custom image deployment or in your custom script extension to automatically implement this task for all new AVD session hosts. Otherwise, you can use Intune Script Deployment if you want to enable this task for existing personal VMs.
$TaskName = "AVD - Shutdown VM after user logs off"
$principal = New-ScheduledTaskPrincipal 'NT Authority\SYSTEM' -RunLevel Highest
$class = cimclass MSFT_TaskEventTrigger root/Microsoft/Windows/TaskScheduler
$triggerM = $class | New-CimInstance -ClientOnly
$triggerM.Enabled = $true
$triggerM.Subscription='<QueryList><Query Id="0" Path="Security"><Select Path="Security">*[System[EventID=4647]]</Select></Query></QueryList>'
#A DELAY IS OPTIONAL
#$triggerM.Delay = "PT15M"
$actionM = New-ScheduledTaskAction -Execute "$env:windir\System32\shutdown.exe" -Argument "/f /s /t 0"
$settingsM = New-ScheduledTaskSettingsSet
$taskM = New-ScheduledTask -Action $actionM -Principal $principal -Trigger $triggerM -Settings $settingsM -Description "AVD - Shutdown VM after user logs off"
Register-ScheduledTask $TaskName -InputObject $taskM
Note: For troubleshooting, please check the event log of the task scheduler.
(OPTIONAL) Scheduled Task to stop the Delayed Shutdown Task
We all love coffee breaks 😅 you might want to add an delay after the logoff to keep the session host vm up an running to ensure a better user experience.
The delay is configurd and enabled for the scheduled shutdown task. You must also schedule a task to cancel the shutdown task when the user logs back in during to the delay phase.
The following PowerShell commands disable and enable the task AVD - Shutdown VM after user logs off:
Disable-ScheduledTask -TaskName 'AVD - Shutdown VM after user logs off'
Enable-ScheduledTask -TaskName 'AVD - Shutdown VM after user logs off'
These PowerShell command lines create the scheduled task to disable and enable the shutdown task at user logon:
$TaskName = "AVD - Stop the Delayed Shutdown Task"
$principal = New-ScheduledTaskPrincipal 'NT Authority\SYSTEM' -RunLevel Highest
$triggerM = New-ScheduledTaskTrigger -AtLogOn
$triggerM.Enabled = $true
$actionM = New-ScheduledTaskAction -Execute "$env:windir\System32\WindowsPowerShell\v1.0\Powershell.exe" -Argument "-command &{Disable-ScheduledTask -TaskName 'AVD - Shutdown VM after user logs off';Enable-ScheduledTask -TaskName 'AVD - Shutdown VM after user logs off'}"
$settingsM = New-ScheduledTaskSettingsSet
$taskM = New-ScheduledTask -Action $actionM -Principal $principal -Trigger $triggerM -Settings $settingsM -Description "AVD - Stop the Delayed Shutdown Task"
Register-ScheduledTask $TaskName -InputObject $taskM
Conclusion
Compute cost of session host VMs are by far the largest cost component. Implementing the process above to automatically turn VMs on at connect and turn them off once the users are no longer connected or they are in idle to long will help you to create a cost-effective AVD environment while avoiding a capital-intensive nightmare.
There are other options like Azure Resource Health triggers, Logic Apps or Automation Accounts we choose Functions since they offer the best control over security options, troubleshooting and logging insights and are the least expensive solution.
Do More With Less - Less complexity, Less time and Less cost 😉
Resources
Learn more about Cost Mangement
Learn more about Tagging
Interested in further cost tracking options, check the Azure Academy for this here: https://www.youtube.com/watch?v=dUft4FZ40O8